This website uses cookies so that we can provide you with the best user experience possible. Cookie information is stored in your browser and performs functions such as recognising you when you return to our website and helping our team to understand which sections of the website you find most interesting and useful.
Articles
Aug
Encrypting Your Hard Disk Using Bitlocker
Posted by Comments Off on Encrypting Your Hard Disk Using Bitlocker
With the many publicised cases of laptop and data theft that have been in the news lately, many people are beginning to think seriously about how to protect the data they have on their laptops. You may simply have private documents, pictures and passwords stored on your laptop or you may carry important, confidential information that really needs to be protected. One of the ways of doing this is to use the bitlocker full-drive encryption system which is included in some of the upmarket versions of windows.
Bitlocker is a feature that comes with the Enterprise and Ultimate editions of Windows Vista and Windows 7. If you have one of the other editions of windows, you can upgrade by buying a “Windows Anytime” upgrade for Ireland or the UK. Bitlocker can be configured in quite a few ways but the easiest and most common is where the laptop concerned contains a TPM (Trusted Platform Module) which is a chip that supports encryption. That is what I will demonstrate in this blog.
Finding out if you have a Trusted Platform Module (TPM)
The first thing you need to do is establish if you have a TPM module. You can do this by checking in your device manager.
Log onto your machine using an account that has Local Administrator priveledges. If your computer is a business machine which is part of a domain, you may need to ask your domain administrator for access.
Click on the start button, right click on “Computer” and then click on “Manage” to open the Computer Management window.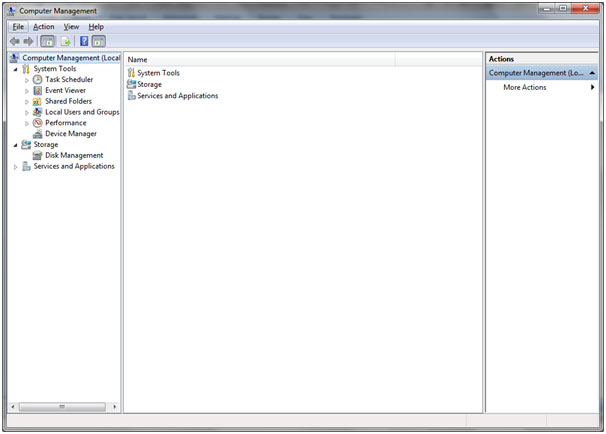
Click on Device Manager to access the device manager. Then click on “Security Devices” in the right pane to reveal your TPM. If it’s not there then you either don’t have one, or it is turned off in BIOS and you need to turn it on.

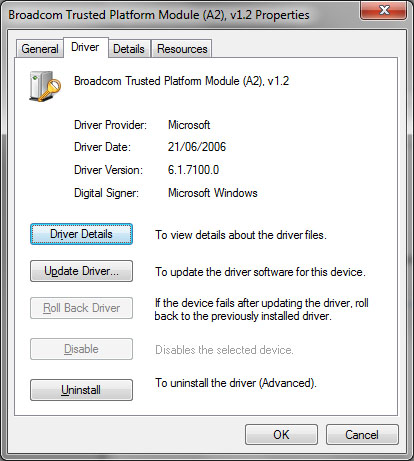
While you’re there, right click on the TPM device and click on the driver tab to ensure you have the correct driver. The name of this has changed in Windows 7 (at least on my machine). The important thing is that you’re running v1.2 of the TPM driver.
Preparing your TPM
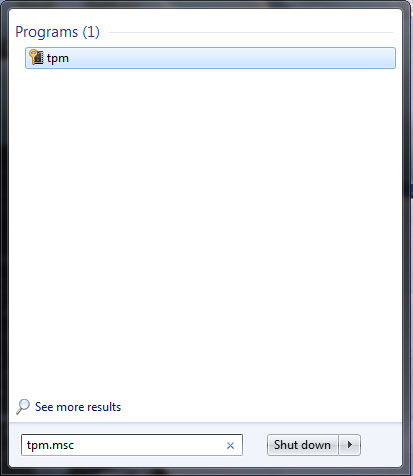
The first thing you need to do is to prepare your TPM. Click on your Start button and type tpm.msc as shown below.
This will open the TPM management console as shown below.
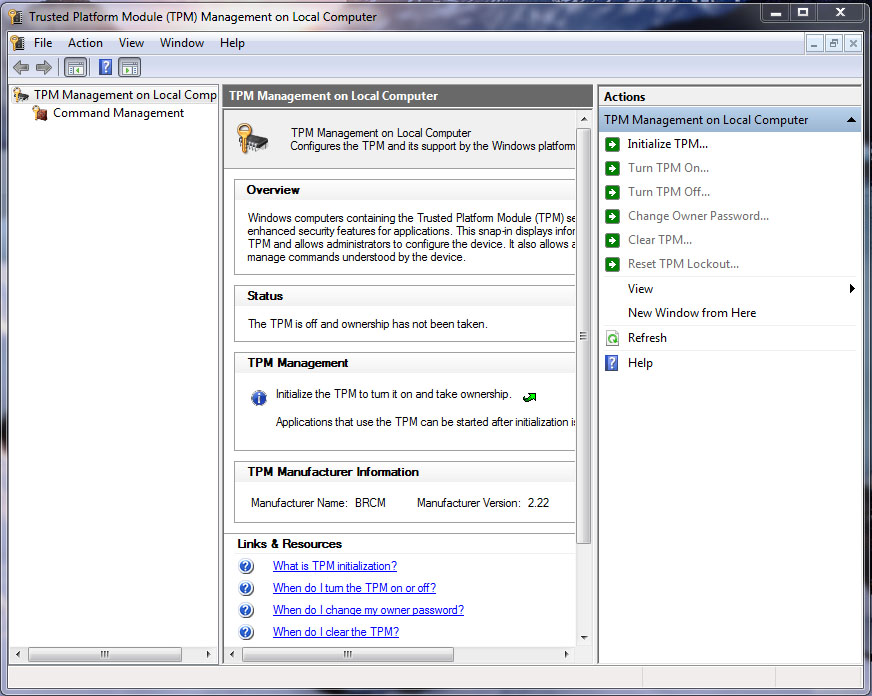
Click on “Initialise TPM” to start the process.
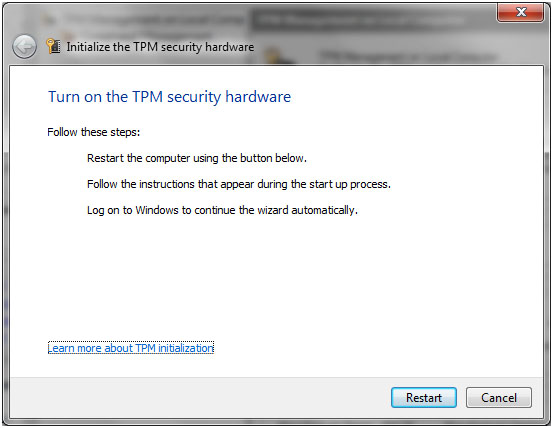
Click restart to restart your machine.
When the machine reboots, a BIOS screen will ask you to confirm the modification. Once you’ve agreed, windows will restart and ask you to create a password.
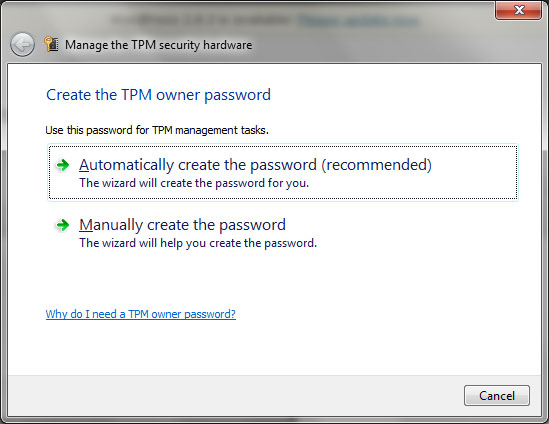
Click “Automatically create the password (recommended)”. You’ll then see your password in the next window. I’ve blurred out the one I generated
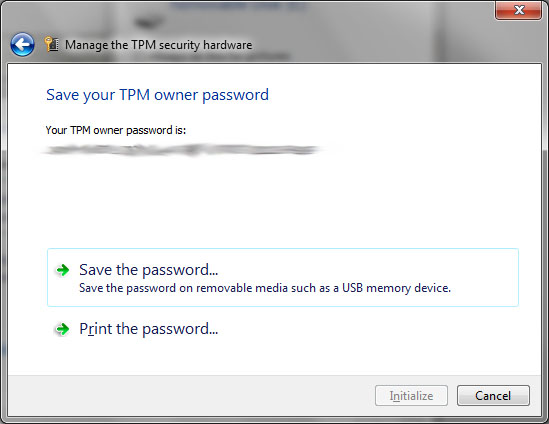
Save the file to a USB key as shown below.
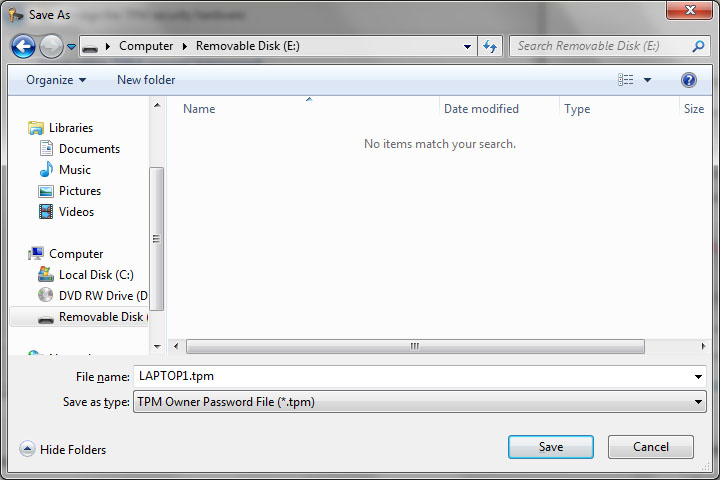
Label the USB key carefully and put it in a safe place. You will need it if anything goes wrong with bitlocker in the future.
Back on the Save TPM Owner windows above, click “Initialize”
The TPM will be initialised.
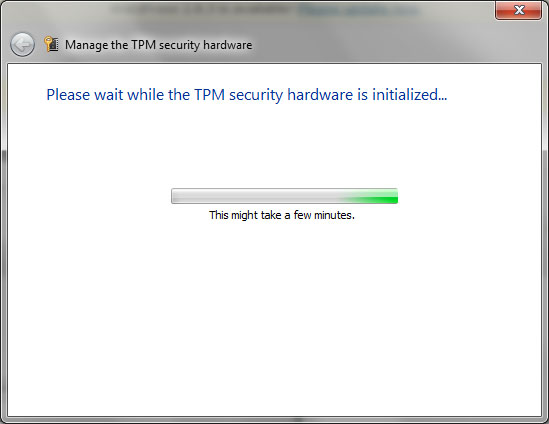
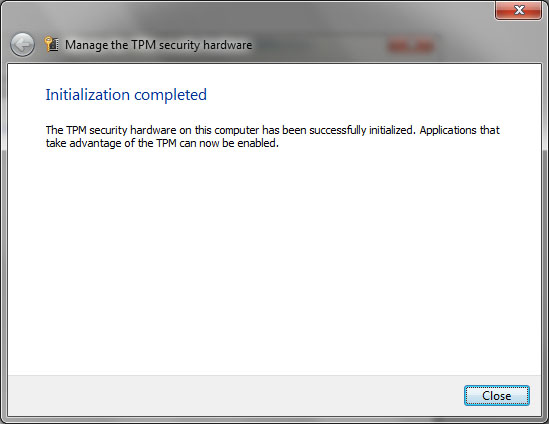
Click Close
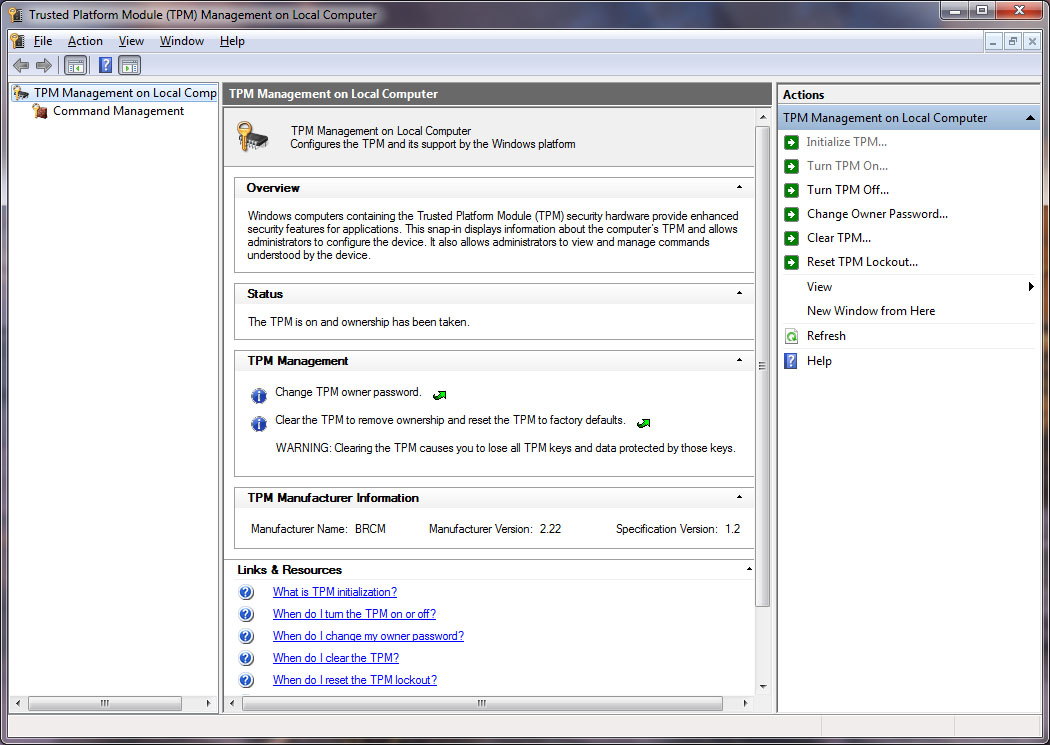
Your TPM should now be intialised and set up. You can check this by going back into the TPM management console, it should look like this now.
Hard Disk Preparation for Bitlocker
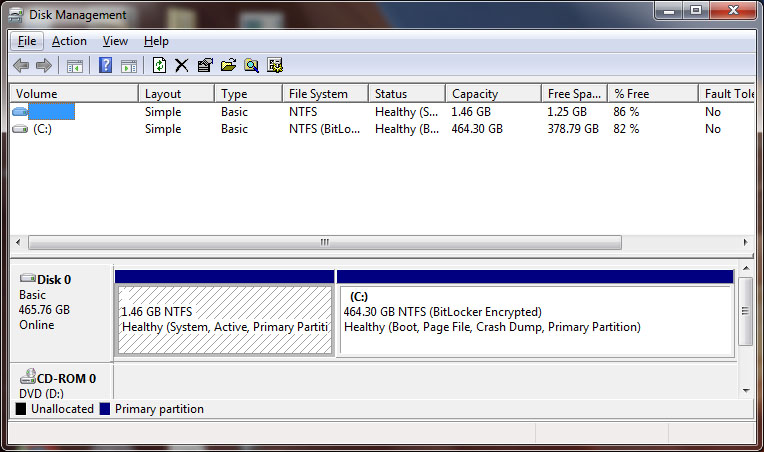
Bitlocker also requires a small partition at the start of your disk where the unencrypted boot volume resides. I created this partition manually. However, there is now a tool to do it automatically which you can download at the following link: BitLocker Drive Preparation Tool. After the drive is prepared, there should be a partitioning scheme similar to the one below. You can check this by clicking the Start button and typing diskmgmt.msc.
N.B. This snapshot was taken after encryption, so initially your partitions will will not show as “BitLocker Encrypted” as shown below – that comes later.
Setting up Bitlocker
Now it’s time to start Bitlocker. You can find it in the Control Panel under System and Security.
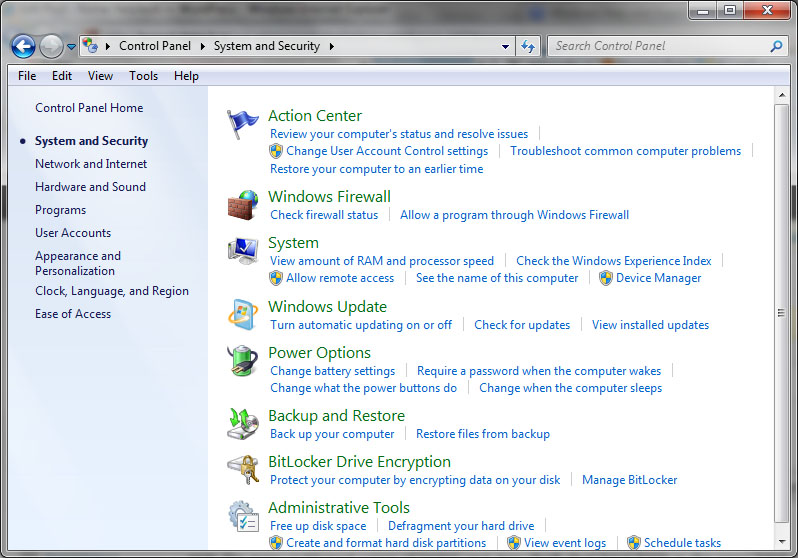
Click on Bitlocker Drive Encryption
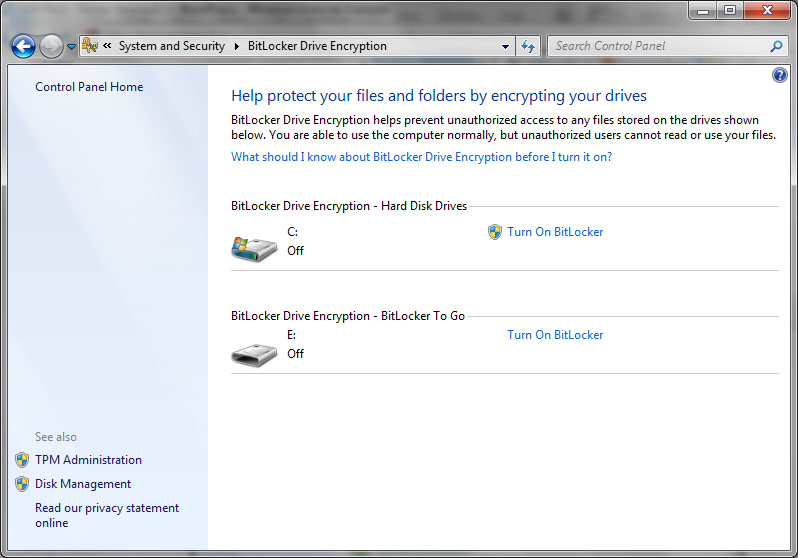
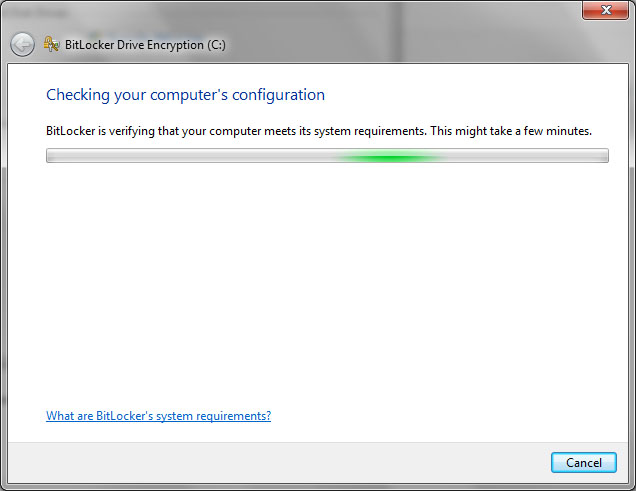
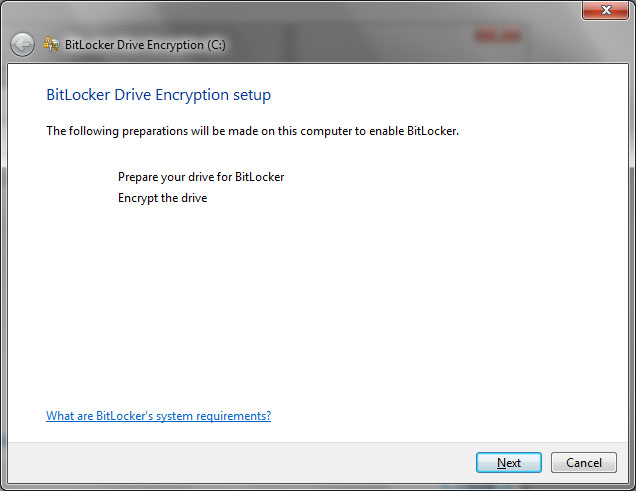
Click Next
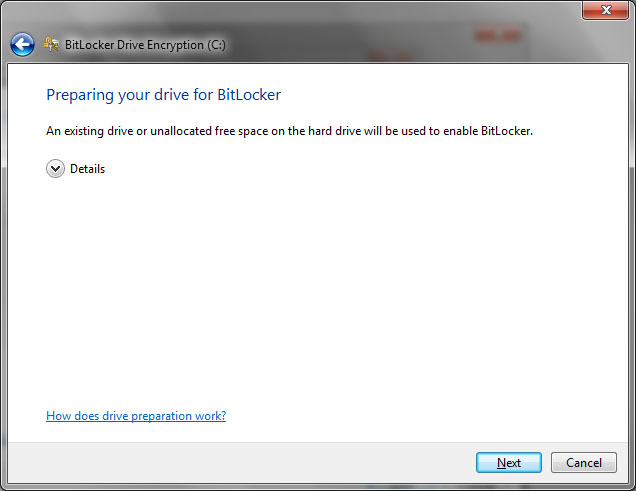
Click Next
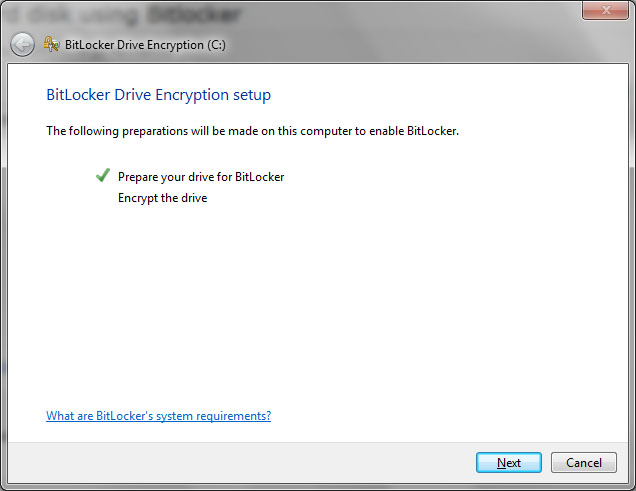
Click Next
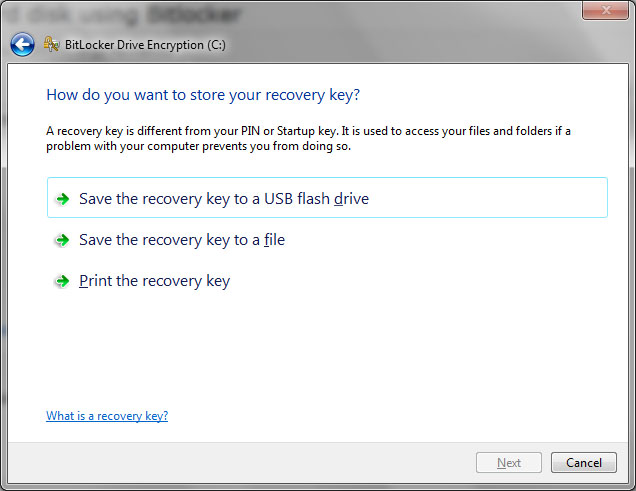
Using the same USB key as before,click on Save the Recovery key to a USB flash drive
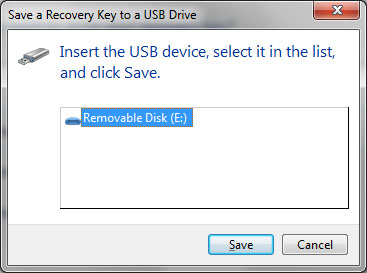
Click save and then next on the previous window.
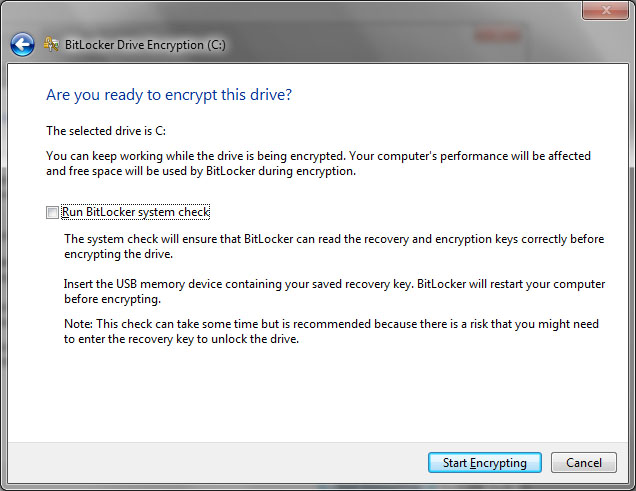
Click Run Bitlocker system check and then click Continue, which appears instead of Start Encrypting.
Click Restart Now when it appears.
The machine will reboot, will briefly show a Bitlocker message when it is restarting and will then re-enter windows. Log in as normal.
It will then start encrypting your disk.
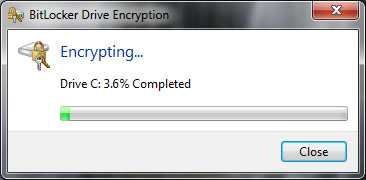
You then need to wait for the encryption to complete. In my case a relatively high spec laptop took around 6 hours to encrypt around 130GB of data. When the encryption completes, the following message is displayed.
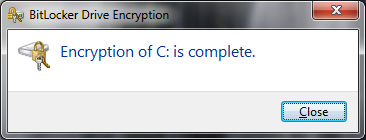
That’s it. You’re done and your data is safe from prying eyes in the future.
If you have any problems with these steps or any other problems please don’t hesitate to call one of our qualified engineers and technicians and we will be delighted to perform the required steps to deal with your problem.
| Lo-Call 1890 219 219 (Ireland) | Freefone 0808-CALHELP (UK) |
| Business Hours: Monday – Friday 9:45 to 6:30 & Saturday 9:00 to 12:00 |
- Bookmark :
- Digg
- del.icio.us
- Stumbleupon
- Redit it
Aug
Business Accounting Packages
Sage is, of course, king of the small business accounting packages in Ireland but with the recession now in full swing, people have been asking about lower cost or free alternatives. With this in mind, it’s worth noting that there are finally some free small business accounting packages available on the Irish market.
TAS books now offers a basic accounting package, aptly named TAS Books Basic does the basics for a small business at no cost.
I can’t help suspecting that in offering a free basic package, TAS is “getting their retaliation in first” against the rumoured release of an international english edition of Microsoft Office Accounting Express which already free in the UK. This package is tightly integrated with the other Microsoft solutions, including Microsoft Office. There is also an easy upgrade path to the inexpensive Professional edition which scales to multi-person and server installations. In fact, the UK version is already quite usable in an Irish context and if you google around enough, it’s even possible to find an unsupported Euro configuration file for those who really want to use it.
Update 1st November 2009: Microsoft are exiting the UK accounting market and will not support Microsoft Office Accounting Express long term
Free Payroll Software
Also getting in on the free software act is Sage themselves, who now offer their Quickpay Free payroll software free for businesses with 1-3 users. Phone registration is required after which you can get free upgrades any time the PAYE/PRSI rules change. The downside of this product is that you will need to buy custom payroll stationery which can erode the value of the “free” offer.
Free payroll software
If you’d rather avoid the need to buy custom blank payslips, we’d recommend that you consider Thesaurus as a payroll package. Thesaurus is an Irish company and is generally considered easier to use than Sage Quickpay. Unfortunately there is no free version of Thesaurus, though there is a free trial available if you wish to try before you buy. The standard version costs €140 per annum. We are agents for Thesaurus, so if you wish to source a copy, do give us a call and we can help you.
Links
Links for each of these packages can be found below.
Microsoft Office Accounting Express (link removed due to product discontinuance)
If you have any problems with these steps or any other problems please don’t hesitate to call one of our qualified technicians and we will be delighted to perform the required steps to deal with your problem.
| Lo-Call 1890 219 219 |Business Hours: Monday – Friday 9:00 to 17:30
- Bookmark :
- Digg
- del.icio.us
- Stumbleupon
- Redit it
Aug
How to remove Windows XP Service Pack 3
Posted by Comments Off on How to remove Windows XP Service Pack 3
Sometimes when windows xp service pack 3 is installed some devices may not work as well as they did before the installation. here is a guide to removing Service pack 3 and rolling back to Service Pack 2.
there are 3 types of ways you can remove the Service Pack :
Use the Add or Remove Programs application in the control panel
- Click on the Start button in the bottom left-hand corner of your screen
- Now click on Control Panel on the right had side of the menu
- Select Add or Remove Programs and a new window will appear
- Tick the Show Updates box and scroll down to Windows XP Service Pack 3
- Highlight it and click Remove
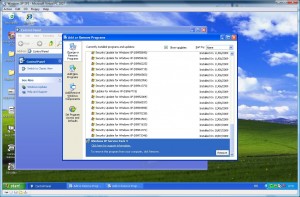
Use a removal wizard that is stored in a hidden folder
- Click on the Start button in the bottom left hand corner of your screen
- Click on My Computer and a new window will appear
- Select Tools and click on Folder Options from the drop-down menu
- Click on the View tab at the top of the new window
- Scroll down to Show Hidden Files and Folders and make sure the radio button is ticked.
- Click Apply and OK
- Now open your Hard Disk Drive where Windows is installed usually (C:)
- now open the next folders Windows > $NtServicePackUninstall$ > Spuninst
- Click on Spuninst applacation
- follow Uninstallation Wizard steps and let it restart your computer if needs be.
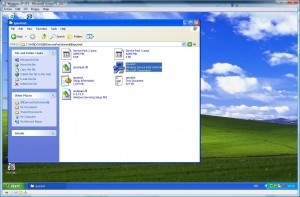
Restore to an earlier point
- follow our post on how to do a system restore below. make sure you select a date just before you installed Windows XP Service Pack 3.
If you have any problems with these steps or any other problems please don’t hesitate to call one of our qualified technicians and we will be delighted to perform the required steps to deal with your problem.
| Lo-Call 1890 219 219 |Business Hours: Monday – Friday 9:45 to 6:30 & Saturday 9:00 to 12:00 |
- Bookmark :
- Digg
- del.icio.us
- Stumbleupon
- Redit it
Jul
Samsung HUtil gives “Copy failed” error
Posted by Comments Off on Samsung HUtil gives “Copy failed” error
Samsung HUtil is a DOS based utility for diagnosing problems with Samsung hard drives. On our disk recovery system here at Home Helptech, it fails to boot for some reason. The disk boots up into DOS but fails with a “Copy Fail” error. I haven’t been able to find any mention of this on the web so I thought I’d note that there is an easy work around.
Then the disk boots up, press the F8 key

Hutil Press F8
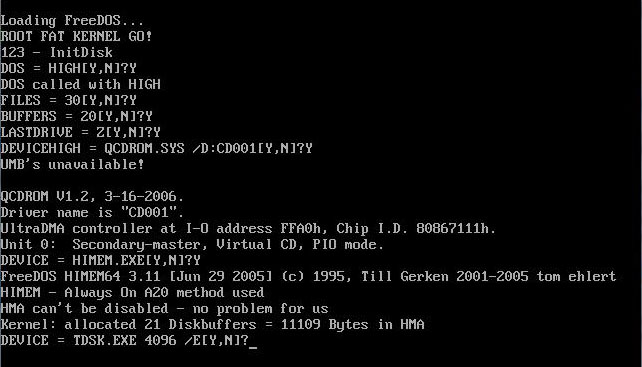
Press Y to step through the code
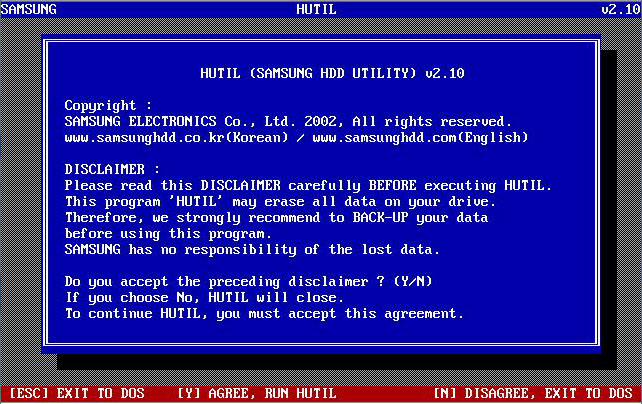
HUtil Startup Screen
- Bookmark :
- Digg
- del.icio.us
- Stumbleupon
- Redit it
Jun
How to do a system restore
Posted by Comments Off on How to do a system restore
A great tool built into Windows Operating Systems is the System Restore function. Basically what system restore does is it takes a screen shot of your computers important files from time to time so if anything goes wrong with your computer then it can be rolled back to a time when it was working just the way you liked it.
PLEASE NOTE : All files and folders should be backed up before trying any of the following steps.
For Restoring Windows XP:
- Make sure you are logged in as Administrator
- Press the Start button, move to All Programs, move to Accessories, scroll down to System Tools and click on System Restore.
- When the program starts it should look like the screenshot below
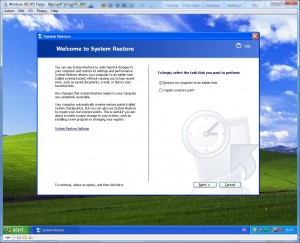
- Make sure that the Restore my computer to an earlier time is checked. Click on the Next button.
- Now select a time your computer was at a healthy point on the calendar. ( dates that the computer can revert back to are usually marked in bold font). Click Next
- A confirmation page will now display what time it is going back to before it restores.
- Your computer will now restart. Log in as Administrator again and your computer will now be at a point to where you wanted it.
For Restoring Windows Vista:
- Make sure you are logged in as Administrator
- Press the Start button, move to All Programs, move to Accessories, scroll down to System Tools and click on System Restore. Click Continue on the UAC warning window
- When the program starts it should look like the screenshot below
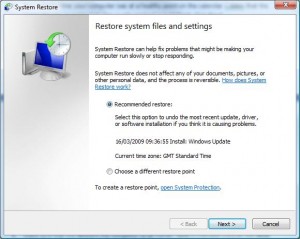
- Make sure that the Choose a different restore point button is checked. Click on the Next button. (You can also use the Recommend restore option and let windows choose a date to when your computer was healthy.)
- Now select a time your computer was at a healthy point on the calendar. ( check the Restore points older than 5 days box for older points). Click Next
- A confirmation page will now display what time it is going back to before it restores.
- Your computer will now restart. Log in as Administrator again and your computer will now be at a point to where you wanted it.
If you have any problems with these steps or any other problems please don’t hesitate to call one of our qualified technicians and we will be delighted to perform the required steps to deal with your problem.
| Lo-Call 1890 219 219 |Business Hours: Monday – Friday 9:45 to 6:30 & Saturday 9:00 to 12:00 |
- Bookmark :
- Digg
- del.icio.us
- Stumbleupon
- Redit it
Jun
Cannot access the internet with Norton Internet Security 2008
Posted by Comments Off on Cannot access the internet with Norton Internet Security 2008
We had a laptop come in today with a problem with accessing the internet. It was a dell XPS laptop and around 6 months old. Norton Internet Security 2008 came supplied with the Laptop. We tried to access the firewall settings on NIS but it was giving us a message informing us that we had to be an administrator to access the firewall settings even though we were logged in using an administrator account. We believed it had something to do with the software so we uninstalled NIS and Internet Explorer worked fine. We tried to install it again but still the same problem. The only way to fix this problem was to download an update of NIS 2009.
Steps on updating Norton Internet Security:
Click on the link below:
- Click on the orange “BEGIN” button at the top of the page
- There should be two pull-down menus, on the “Select a product” bar highlight Norton Internet Security
- On the “Select a version” select 2008
- Click on “CONTINUE”
- There should be a table on the next page and on the last column called free update, click on the button “DOWNLOAD”
- A window will appear with a “START DOWNLOAD” button, click on it.
- When the File Download screen appears click on “RUN”
- In the UAC window click “CONTINUE”
- When the computer downloads the file click the icon on your desktop to run the update and follow the instructions.
If you have any problems with these steps or any other problems please don’t hesitate to call one of our qualified technicians and we will be delighted to perform the required steps to deal with your problem.
| Lo-Call 1890 219 219 |Business Hours: Monday – Friday 9:45 to 6:30 & Saturday 9:00 to 12:00 |
- Bookmark :
- Digg
- del.icio.us
- Stumbleupon
- Redit it
Jun
How to remove Antivirus 360
Posted by Comments Off on How to remove Antivirus 360
A Virus that has been circulating at the moment is called Antivirus 360 . It is a rogue antispyware that promotes itself as an Antivirus program. It pretends to scan your computer and projects a false page that your computer is infected with hundreds of viruses as shown in the screenshot below:
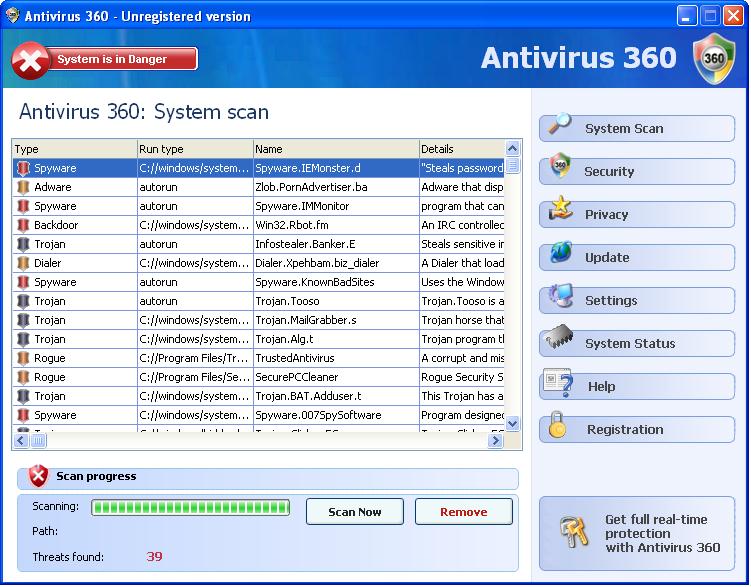
WARNING:
It will claim to get rid of these viruses by entering your credit card details and paying a simple fee of €60 (PLEASE DO NOT ENTER YOUR DETAILS). It will also imbed an icon in your tool tray with the rest of your programs to look like a legitimate anti virus.

How to Remove the Antivirus 360 Virus:
- First of all you need to download a program called Malwarebytes Anti-Malware and install it on your computer.
- When malwarebytes is finished installing it is important to let it update and then let the program run.
- When Malwarebytes is running perform a quick scan of your system to search for any unwanted guests.
- After the scan is finished click on “Show Results” to look at the infected objects.
- Click on the “Remove Selected” button to get rid of any infections, Malwarebytes may now need to restart the computer it is important you let it do so.
- When the computer restarts close the Malwarebytes and your computer is now clean of the Antivirus 360 program.
- Scan your computer with your usual antivirus program to remove any other threats.
If you have any problems with these steps or any other problems please don’t hesitate to call one of our technicians and we will be delighted to perform the required steps to deal with your problem.
| Lo-Call 1890 219 219 |Business Hours Monday – Friday 9:45 to 6:30 Saturday 9:00 to 12:00 |
- Bookmark :
- Digg
- del.icio.us
- Stumbleupon
- Redit it


